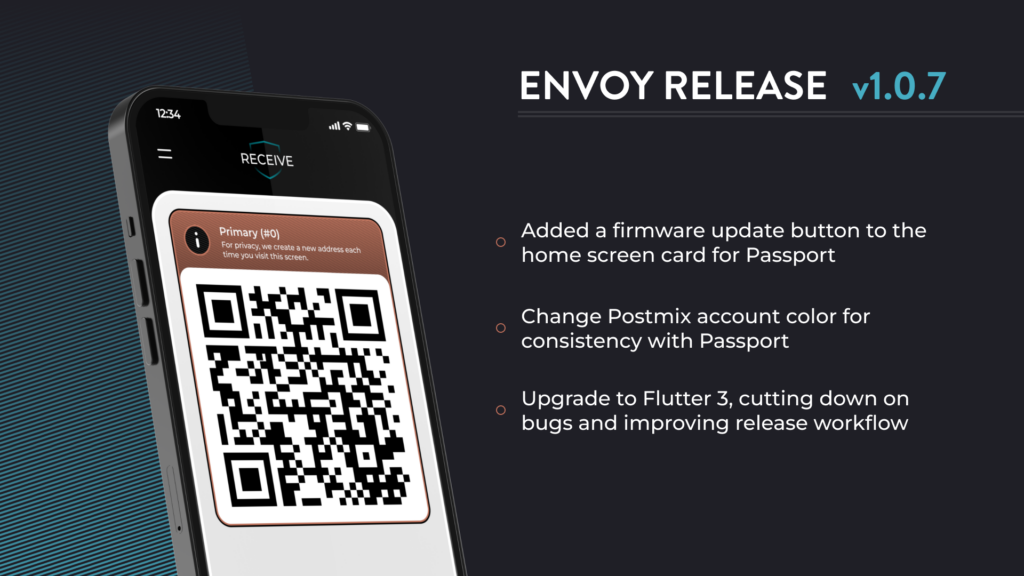
We’re excited to announce that the latest version of Envoy – 1.0.7 – is now live on all your favorite mobile platforms! To download it, simply visit our download page or check for updates on your platform of choice.
What’s changed
With version 1.0.7 of Envoy, we added in a firmware update button to simplify the process of installing firmware updates after you’ve initially setup your Passport, squashed some pesky bugs, and overhauled our app to the latest Flutter release.
For more details on each of the changes, keep reading below!
New Features
Added a firmware update button to the home screen card for Passport
Now you can force a firmware update anytime, anywhere for your Passport device straight from Envoy’s home screen
One of the core tenets we live by here at Foundation is that of “don’t trust, verify.” We’ve long had a detailed guide available for verifying and updating the firmware on Passport in a secure way, but we want to expand on that by empowering users to more easily validate Envoy on Android. In this guide we’ll walk through the “why” and “how” of verifying the APK file (the raw binaries that Android uses for manually installing applications) with both simple hash verification and full PGP signature validation to ensure that the app you install is exactly what we published and has not been tampered with in any way.
Why is verification important?
While the Google Play Store and Apple App Store provide a secure centralized method to distribute apps, control over the published application ends up in the hands of Google and Apple, respectively. Because of these centralized “walled gardens,” the ability for end users to verify that the applications they are installing are exactly what the developers publish is minimized, and trust is placed in the app store provider.
When downloading the APK directly from Github, however, we unlock the ability to provide additional guarantees that the application you’re installing is exactly what we at Foundation have made and that it has not been tampered with along the way. Because we’re focused on securely storing and spending Bitcoin with Passport and Envoy, many users understandably want to take as many steps as possible to ensure that their funds are safe against even advanced attacks.
When downloading binaries directly (essentially what an APK file is), even from websites you’d normally trust like Github, you’re placing trust in the source of that binary to match the source code you expect. Verifying the zipped (or compressed) APK file we publish on Github prevents Github (or a malicious attacker somehow injecting themselves between you and Github’s servers!) from being able to tamper with the Envoy APK without being detected. This verification process does require some extra work but can provide additional peace of mind to users of Envoy while reducing trust in third-parties.
Let’s look at how exactly we can perform this verification on Android itself.
Simple hash verification
While full verification via PGP keys is more secure, simple hash verification is very easy and faster to perform while still giving some security guarantees against more trivial man-in-the-middle attacks. A hash of a file is a fixed-length string that uniquely represents a given file, where changing even a single bit of the file would result in an entirely different hash. As a given input file can only have a single hash, comparing the expected hash against the downloaded file ensures that not even a single bit in the file has been changed or corrupted.
Download and install “DeadHash” via the Google Play Store or F-Droid
This SHA-256 hash (the same hashing algorithm used for Bitcoin mining!) is a way to represent the file in a way that cannot be falsified
Open DeadHash and select the folder icon to choose the Envoy APK zip file
Select the downloaded APK zip file, i.e. envoy-apk-1.0.7-18.zip
Paste the hash you copied into the “Compare” field
Press “Calculate”
Ensure that the SHA-256 hash validates and gives you a nice green check-mark
All of the hashing algorithms except for SHA-256 should show a red X, as we’ve only provided the SHA-256 hash
If you get a red X for all hashes, including SHA-256, stop immediately and reach out to us at [email protected]! If it does match, you’re all set.
DeadHash giving a successful hash check
Fully verifying Envoy via PGP
While more involved than simple hash verification, taking the time to validate our PGP key and signatures ensures that as many threats as possible are mitigated. When you validate the PGP keys and signatures of Envoy, you ensure that only a successful attack would require both the PGP private keys and control over our Github account(s). This verification also entirely mitigates the risk, however minor, of Github themselves tampering with the APK.
Getting setup
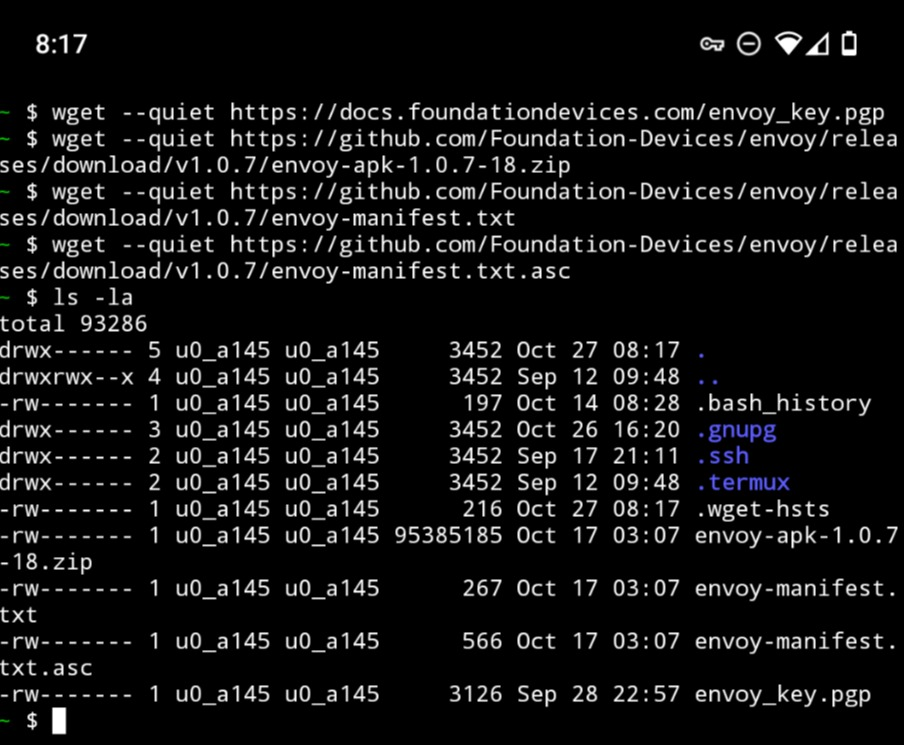
Before we get started, you’ll need to download and install a separate app on your Android device to enable you to validate the PGP key used to sign the Envoy zip file, and then import the Envoy signing key. For each of the steps below with commands (i.e. pkg install wget gnupg -y), simply copy and paste these into Termux and hit enter.
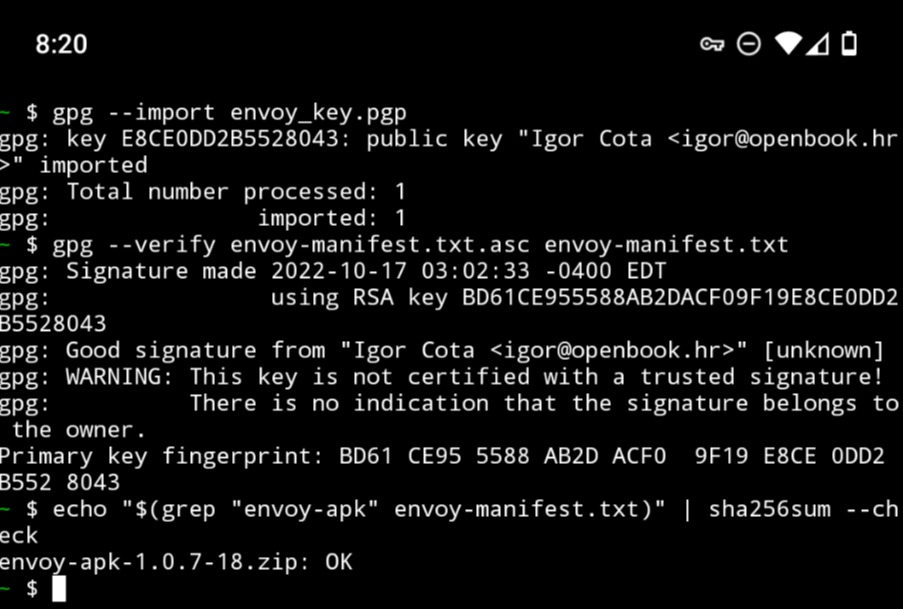
You should see output including “Good signature from ‘Igor Cota <[email protected]>‘” in a line of the output from this step
This step ensures that the GPG key we publish was the one used to sign the envoy-manifest.txt file, and that the file has not been tampered with in any way
This step compares the hash for the APK zip in the envoy-manifest.txt file that we’ve verified via PGP with the SHA-256 hash of the actual APK zip file we’ve downloaded, ensuring no tampering or corruption has happened
If the output says something like envoy-apk-1.0.7-18.zip: OK, you’ve successfully verified the binary and can go ahead and install with added peace of mind
Note that the file name will change with each release, but you should always get the “OK” at the end!
If the output does NOT say “OK“, stop immediately and reach out to us at [email protected]!
Successful verification of Envoy via Termux
Conclusion
Congratulations on successfully verifying Envoy! These steps are certainly going above and beyond, but keeping with the “don’t trust, verify” mantra is one that always pays off. If you’d like to read more about the PGP or simple hash verification process, you can take a look at the following links:
Casa is one of the Bitcoin ecosystem’s leading collaborative custody services. Using the Casa mobile app, you can create a multi-signature wallet consisting of either:
3 keys (Gold Plan) – 1 user secured signing device like Passport, a key stored on the user’s phone (backed up to the cloud), and Casa holding the third key.
5 keys (Platinum Plan) – 3 user secured signing devices, a mobile key and a fifth key held by Casa.
With this setup, the user is always the majority key holder, and Casa alone cannot spend any funds from the wallet. Under normal operation, users do not need to interact with the key held by Casa and can authorize transactions themselves using their majority key set. Where the Casa key comes into play is in a scenario where the user loses access to 1 key in the Gold Plan, or 2 keys if using the Platinum Plan. In this scenario, the user can initiate a Recovery transaction to spend, with the help of Casa, their Bitcoin to a new multisig wallet where all keys are accessible once again.
With the release of Passport firmware v2.0.4, we are thrilled to announce that using Passport with Casa is now easier than ever. Passport’s new Extensions menu lets you quickly and easily enable different features that unlock new functionality. Once enabled, the Casa extension adds an additional Casa account screen. From here you can do the typical transaction signing as you would with any other Passport account, but you’ll also notice some Casa specific features, such as ‘Health Check’, that allows you to quickly confirm that Passport is still connected with your Casa account. You’ll also find a customized Casa connection wizard that makes your initial setup a breeze!
Founder’s Edition Passport users fear not, we will be porting all of the new v2.0.4 features to your firmware very soon.
Who is this guide for?
For the reasons outlined above (and many more), Casa functions incredibly well to help many Bitcoiners secure their wealth. This tutorial is for those users that want to leverage the power of a collaborative custody setup like Casa, but at the same time want to minimize the level of trust they place in Casa. The following steps show how to recreate a ‘watch-only’ version of a Casa multisig wallet. This watch-only version of the wallet will be created in the free and Open Source desktop application, Sparrow Wallet. Being a watch-only, Sparrow will not have the ability to spend any funds from within, though we will make a brief mention of the additional steps required to do this later.
There are three main reasons a user might want to carry out these steps:
To check that Casa is generating receive and change addresses that belong to the wallet created with the three keys provided. Later, we’ll leverage Passport’s ‘verify address‘ scanning feature to make this super simple.
In preparation for a doomsday scenario in which Casa the company ceased to exist and the user needed to recover their funds without the help of Casa.
To use the Whirlpool coinjoin service within Sparrow to mix directly into their Casa multisig wallet.
Sparrow Wallet Preview
Before we start
The following steps assume a few prerequisites are met. Ensure you meet all three requirements before attempting to complete this tutorial:
You have a Casa multisig wallet setup and active on your Android or iOS device.
You have a secure method of transferring sensitive information from your phone to the device running Sparrow Wallet. Examples include Signal, Keybase, or an encrypted notes app like Standard Notes.
Exporting the public keys
To recreate the Casa wallet in Sparrow, we need the public keys from each wallet participant as well as the corresponding derivation path and fingerprint for each. If you’re a Gold plan user, that means you’ll need to check 3 keys, and Platinum users will need to check 5 keys.
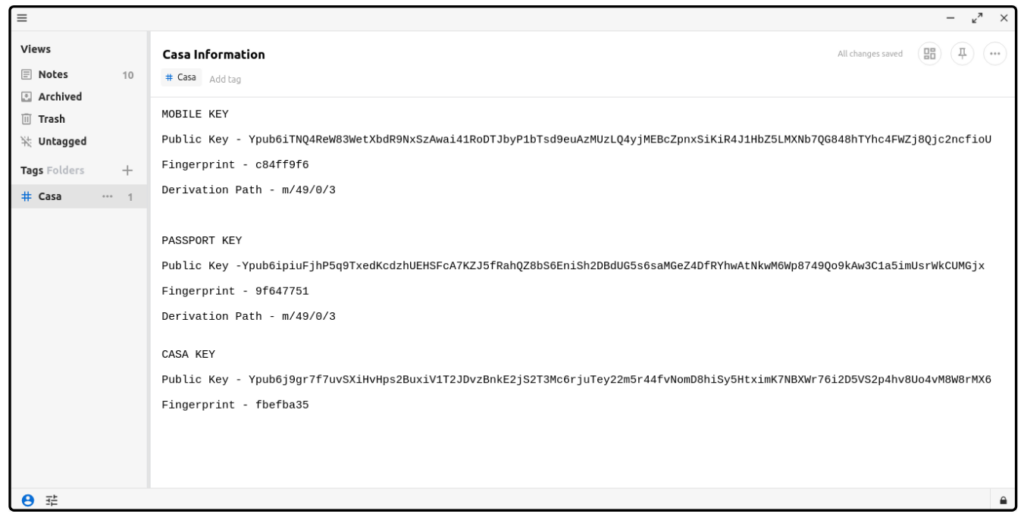
Open the Casa app, click on any of the available keys, then tap ‘View Public Keys‘. Copy and paste all information shown into your chosen secure transfer app. Be sure to carefully label which key the information belongs to.
Repeat these steps for every key until you have something that resembles the image below. Depending on how you’ve used the Casa app prior to this guide, your derivation paths may be different to those shown in this guide. Also note the lack of a derivation path for the Casa Recovery Key, the Casa app does not display this information.
Standard Notes app displaying the exported Casa wallet information
Enter Sparrow
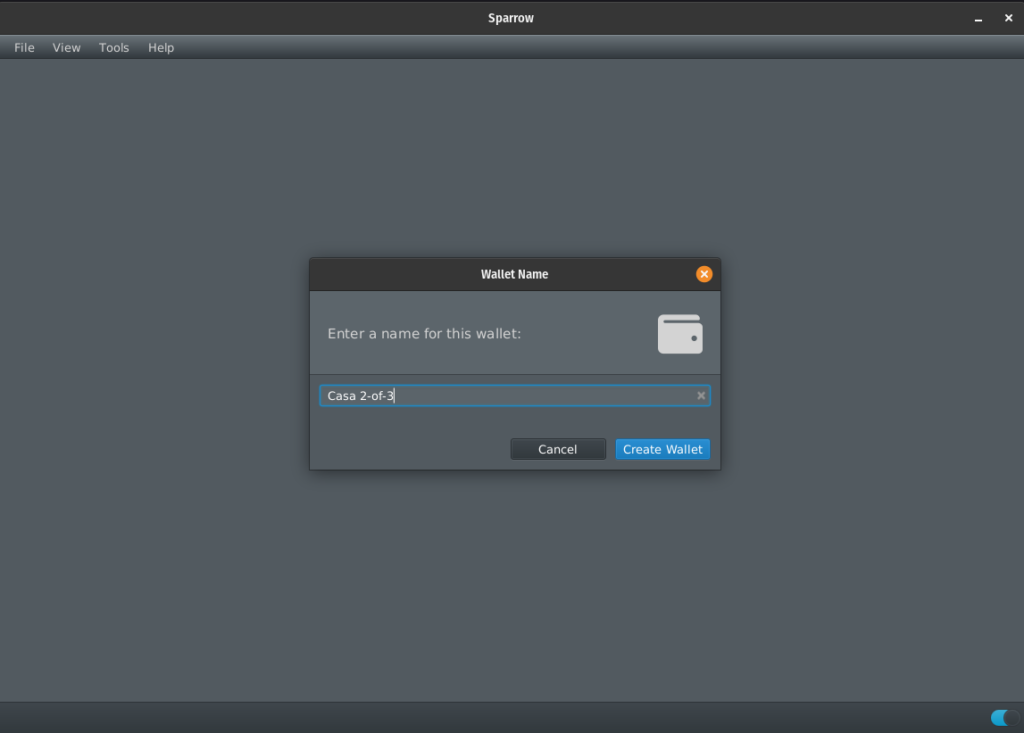
Now that we have the required information from Casa, we can turn our attention to Sparrow. Click File > New Wallet and give the wallet a name
Sparrow Wallet Creation
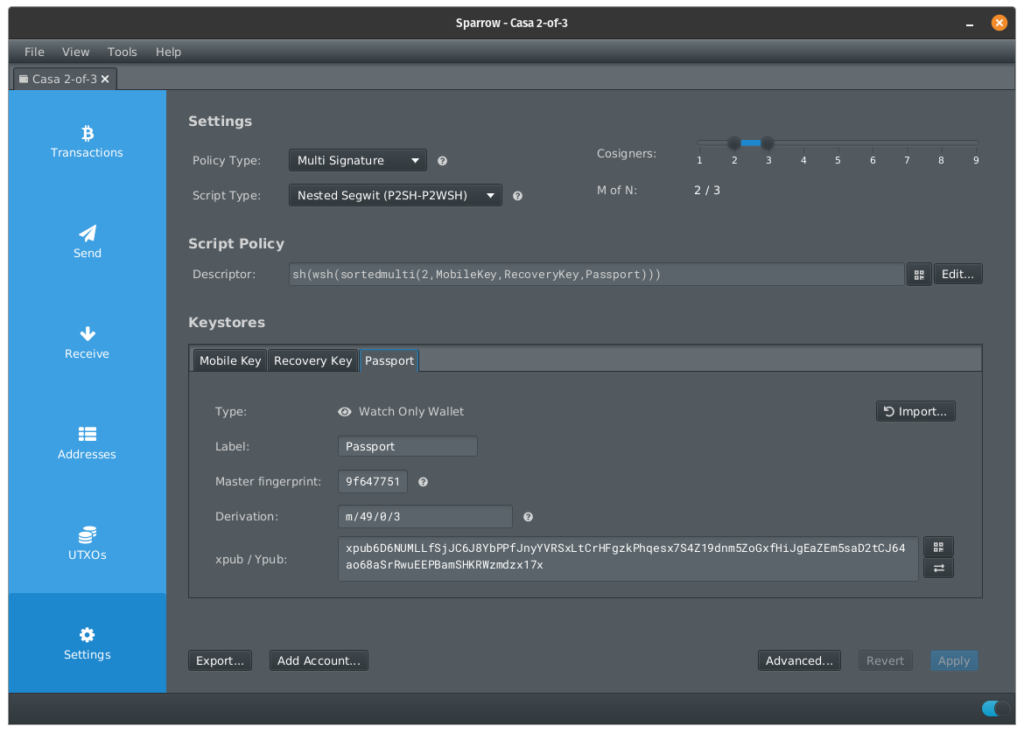
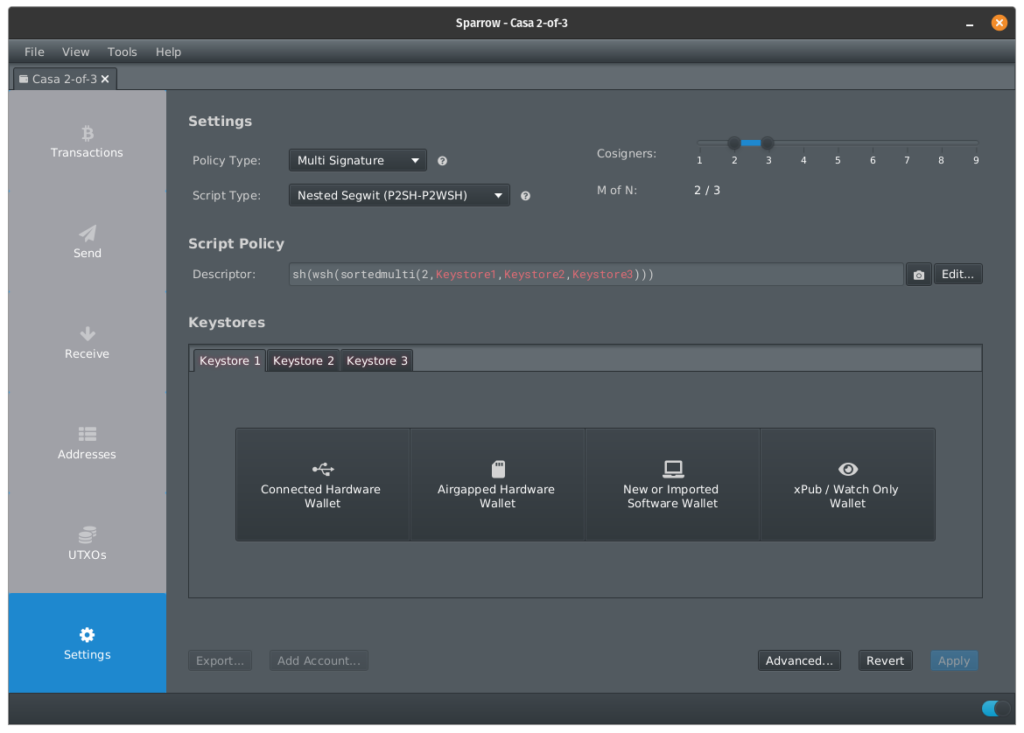
On the following screen, change the ‘Policy Type’ to Multi Signature, then change the ‘Script Type’ to Nested Segwit and finally, set ‘Cosigners’ to 2/3. This will set the wallet’s spending policy to match Casa where two signatures out of a possible three are required to spend from the wallet. If you are following this guide as a Platinum user, set ‘Cosigners’ to 3/5, where three signatures from a possible five are required to spend.
Sparrow Wallet configured to suit the Casa setup
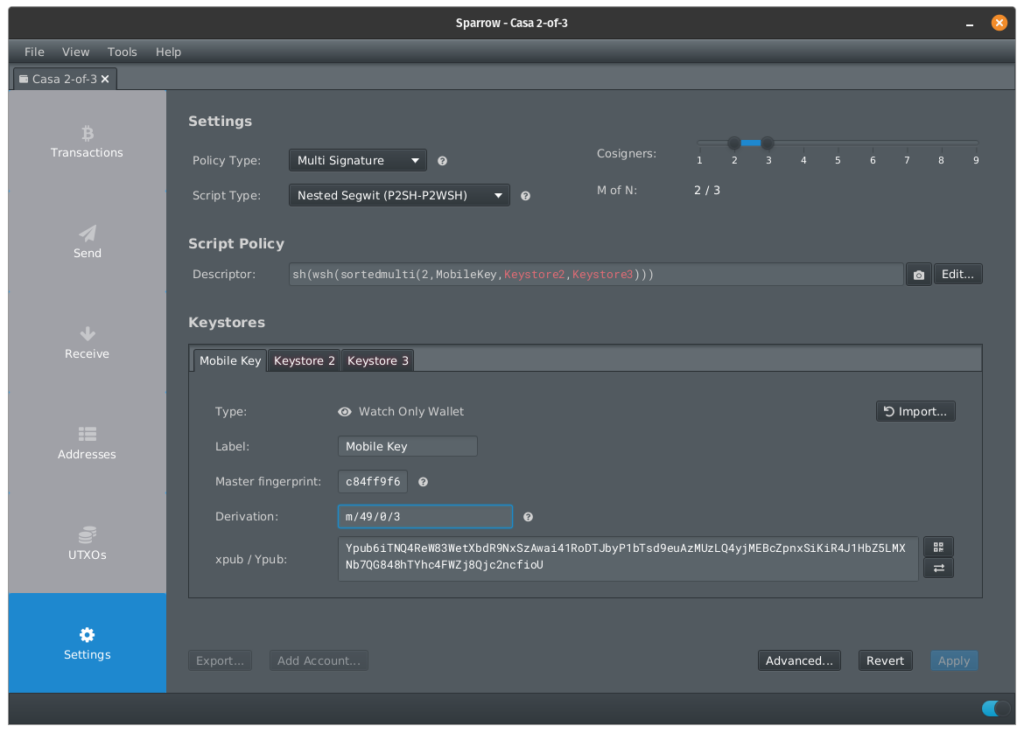
The next step is to import the information taken from the Casa app, into Sparrow. Sparrow represents each cosigner as a ‘Keystore’, and for the purposes of this guide, all three cosigners will be imported using the ‘xPub / Watch Only Wallet‘ option.
Populate the first Keystore using the information saved in your chosen transfer app, ensuring you enter each piece of information exactly as it was copied from Casa.
Keystore 1 populated with public key information
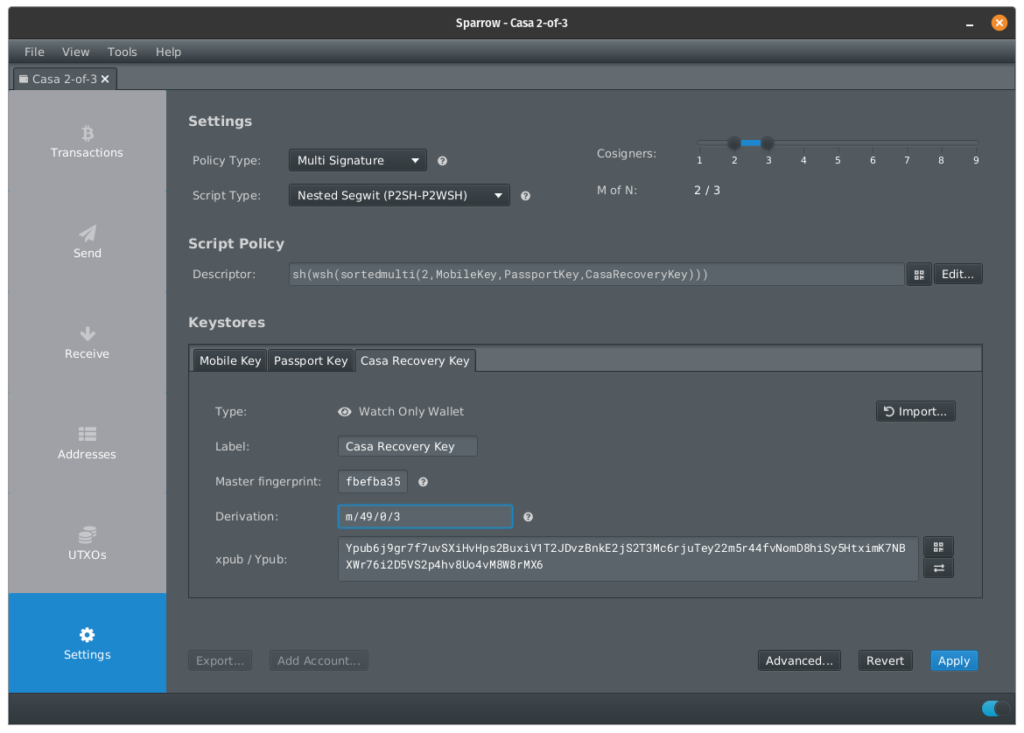
Repeat for all cosigners until each Keystore in Sparrow is populated. For the Casa Recovery Key, enter the same derivation path used for all other keys.
All Keystores populated
Once completed, click ‘Apply’. Sparrow will then ask if you’d like to set a password to prevent unauthorized access to the wallet. This password is unique to Sparrow and, if applied, ensure it is securely backup up.
Do they match?
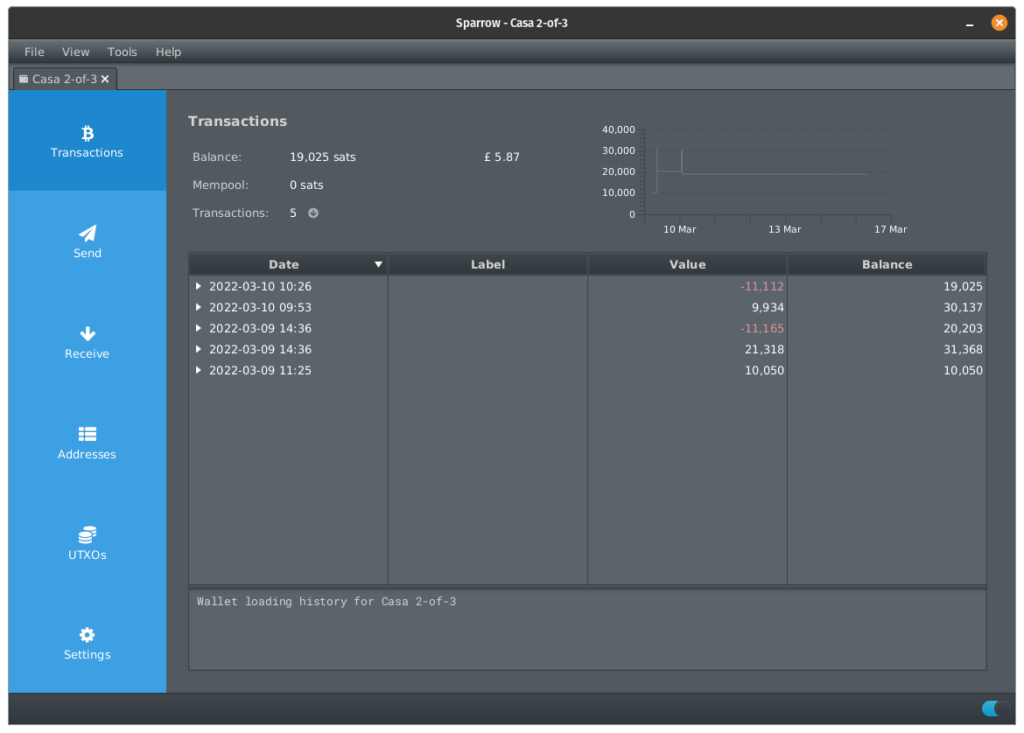
If you followed these instructions successfully, opening the Transactions tab will reveal your Casa wallet’s total balance and transaction history. If you do not, open the Sparrow Settings tab and double check the information entered is an exact match to that shown in Casa.
Casa Wallet successfully imported into Sparrow
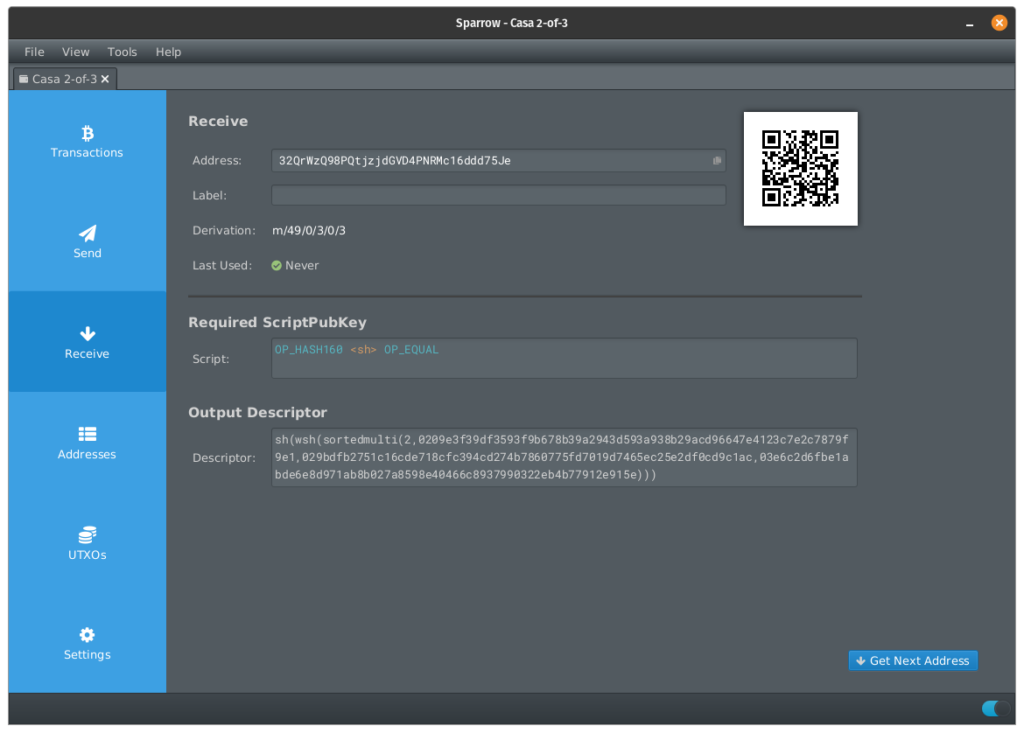
Open the Receive screen in both Casa and Sparrow and check that the addresses shown are an exact match. We can now be confident that Casa is generating the correct receive addresses for your multi-signature wallet. If desired, you can repeat this check every time the Casa app shows you a new receiving address.
Sparrow Wallet receive screen
Verifying with passport
To leverage Passport’s powerful ‘Verify Address’ feature to verify all future addresses shown by Casa (or Sparrow) with a simple scan, we need to make Passport aware of the wallet configuration. Unlike other multisig wallet coordinators, Casa does not currently have a way to export this information via QR code or microSD card, but there are two other ways we can get this information to Passport.
Option 1 – Passport Multisig policy
By having Passport’s multisig policy set to ‘Ask to Import’, Passport will automatically pull the required information from the transaction details when signing a transaction with Casa.
Passport import multisig config
option 2 – use sparrow
With the multisig wallet open in Sparrow, head to Settings > Export, then click ‘Show’ next to ‘Passport Multisig’. Sparrow will then display an animated QR code containing all of the wallet public information which will notify Passport of the wallet details.
Multisig wallet config export
On Passport head to Settings > Multisig > Import from QR then scan the QR being displayed by Sparrow. Review the details shown on screen and then confirm.
scan + go
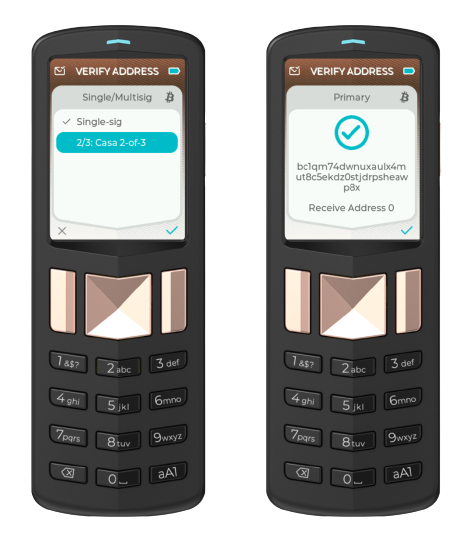
Now, when using the Verify Address feature on Passport, you’ll be able to choose your imported Casa wallet from the list and will get a confirmation that the address being shown is part of your multisig wallet.
Passport Address Verification
What if i want to spend?
At this stage Sparrow is acting purely as a watch-only wallet that cannot spend, and has no influence on the activities taken in the Casa app. The private keys required to authorize spends are still stored on your Passport, your phone and on the Casa Recovery Server respectively. But what if Casa were to disappear and you needed to move your Bitcoin?
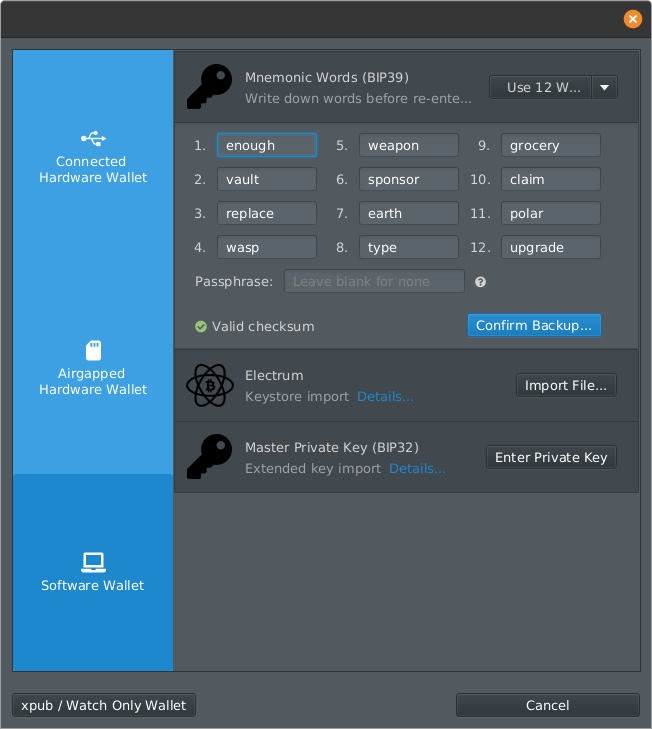
In this very unlikely scenario, the steps required are almost identical to those outlined above. The only difference being, that instead of importing the Mobile cosigner’s public key, we instead need to import its private key. This private key can be exported from Casa by tapping on the mobile key then ‘Import or Export Backup’, followed by ‘Export Private Key’. Casa will then display a list of seed words that should be stored securely and not shared with anyone.
Once you have the mobile key’s seed words, you can change that Keystore in the Sparrow settings. Click ‘Import from an external source’, choose ‘Software Wallet’ then ‘Mnemonic Seed Words (BIP39)’. Then enter the seed words you noted down from the Casa app.
Importing a mnemonic seed to Sparrow
On the following screen set the derivation path to match the other cosigners and click ‘Import Custom Derivation Key’. To finalize these changes click ‘Apply’ on the settings screen.
Custom derivation path setting
Sparrow now contains 1 of the 3 private keys required to spend from this multisig wallet. Now, to spend your Bitcoin to a new wallet, all that’s required is to create the transaction by following the usual steps and providing a second signature with Passport. The video below demonstrates the typical signing flow with Passport + Sparrow.
https://youtu.be/Gx0mke_4BJU
A note on key rotations
When one key is compromised and replaced, Casa bumps all other keys to the next account level in their respective derivation paths. This means that any time a key rotation is performed within Casa, the above steps must be repeated. More experienced Sparrow users may opt to manually update each Keystore to reflect the wallet changes, but it is good practice for newer users to get comfortable creating the wallet from scratch.
BONUS – coinjoin directly to your casa wallet!
Sparrow Wallet recently incorporated the Samourai Wallet Whirlpool coinjoin implementation. Conjoin is one of the best methods available to preserve your privacy when interacting with Bitcoin’s transparent ledger. Sparrow enables you to participate in coinjoins via your computer without the need for an Android phone. Additional to the Whirlpool functionality, Sparrow also enables users to have those mixed outputs be sent automatically to any another wallet managed by the same Sparrow application. No additional user input, just start the mix, leave Sparrow running and it will do the rest for you!
This section of the guide is not designed to be a detailed walk through of using Whirlpool with Sparrow. For that, you can read this guide or watch this video. Prerequisites for this section of the guide:
Have a Casa wallet imported into Sparrow.
Have a single signature hot wallet (where Sparrow holds the seed words) set up in Sparrow.
Have the hot wallet funded with the amount of Bitcoin you want to coinjoin.
Starting the mix
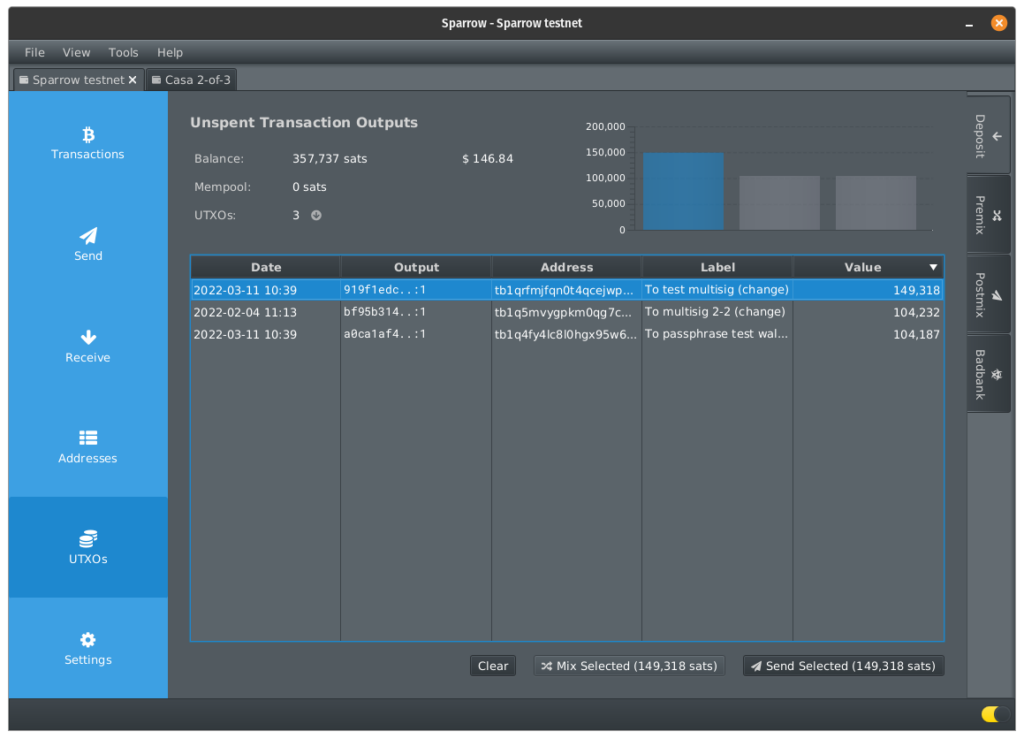
With your hot wallet open in Sparrow and funded with the amount of Bitcoin you want to coinjoin, open the UTXO tab and from the list, select the UTXOs you want to mix. Then choose ‘Mix Selected’.
Starting a mix with Sparrow Wallet
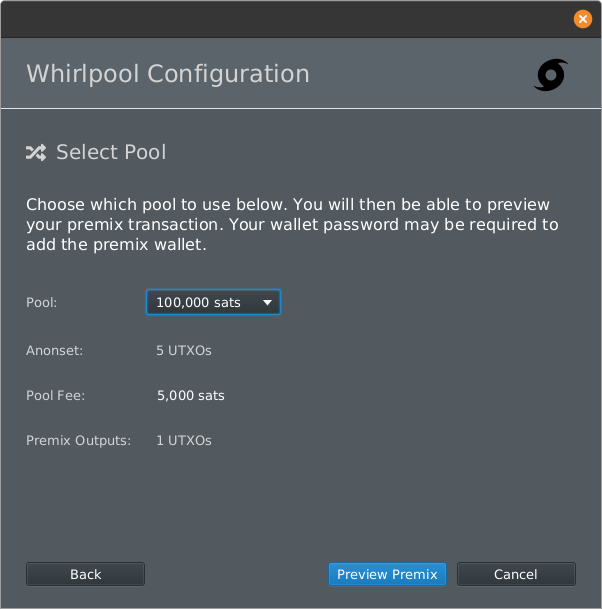
Work through the following dialogue screens to select your miner fee and pool size to enter. The pool size you choose will depend on the amount of Bitcoin you are mixing plus the desired denomination of mixed output you desire. To confirm click Preview Premix.
Whirlpool info screen
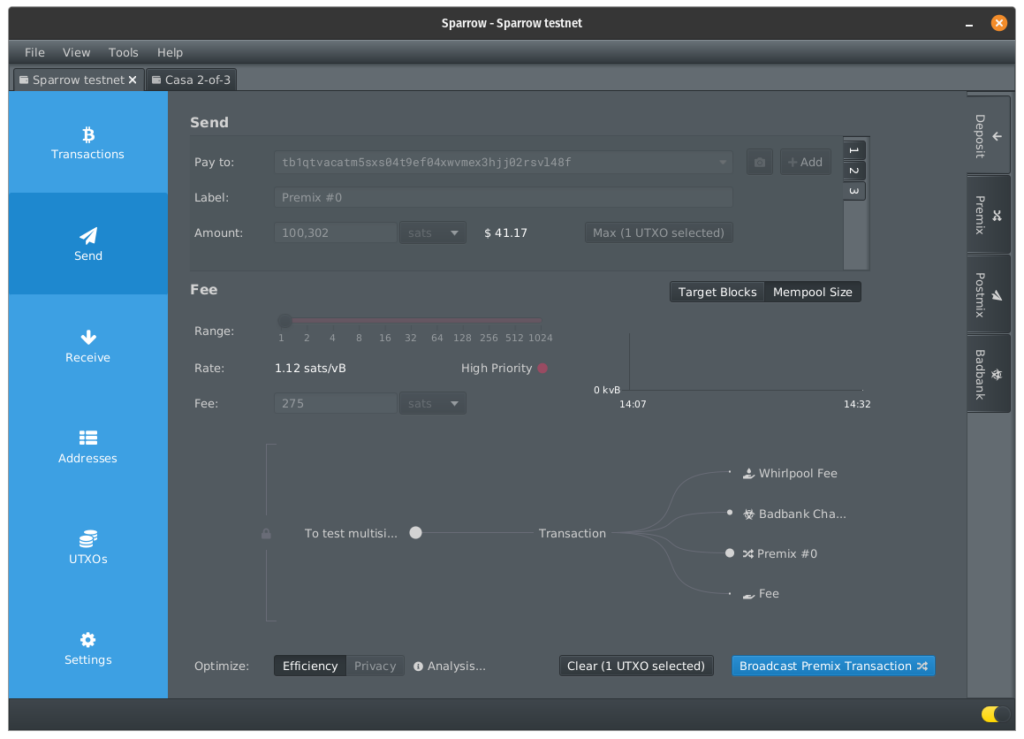
On the following screen Sparrow provides a breakdown of the fees involved and mixed outputs created from the coinjoin. When you are happy click Broadcast Premix Transaction.
Premix preview
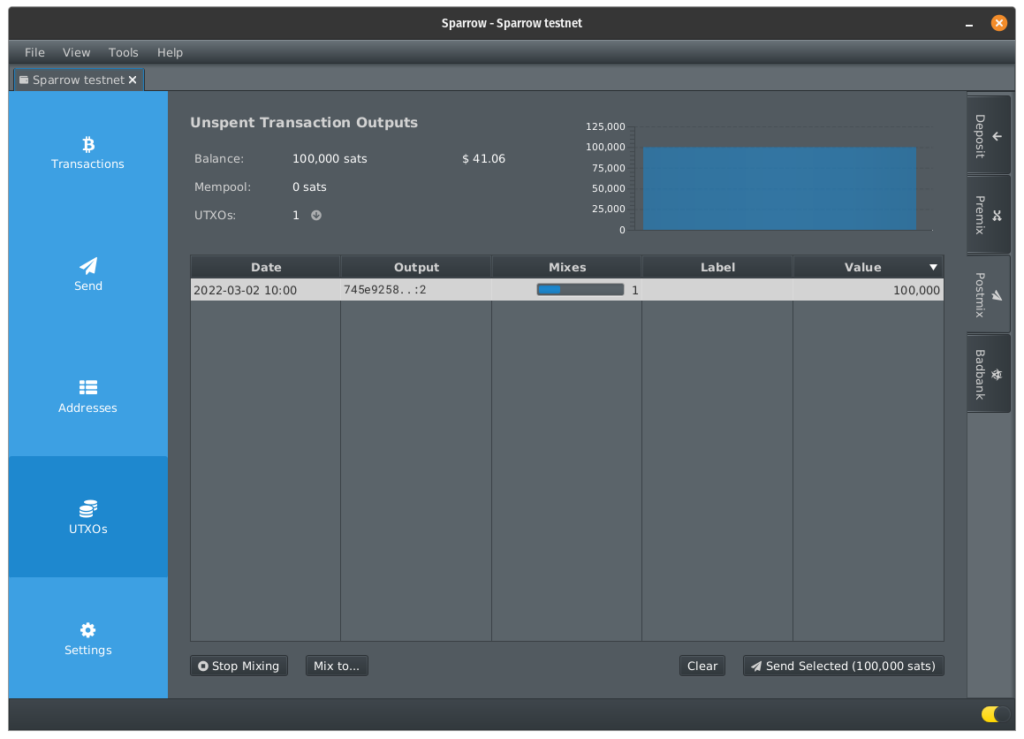
The coinjoin is now initiated and Sparrow will take over and do the rest for you, provided you keep the application running. After a short while, navigate to the Postmix tab from the side bar to see your mixed outputs. How many you see in this screen will depend on the amount of Bitcoin you elected to mix, and in which pool.
Mixing larger amounts in smaller pools may take longer to complete, so do not be alarmed the expected amount of Bitcoin does not show up immediately.
Sparrow Wallet Postmix Tab
Mixing to your casa multisig
To get your mixed outputs sent automatically to your Casa multisig, ensure both your hot wallet and the imported Casa wallet are open in Sparrow. Then navigate to the Postmix UTXOs tab and select the UTXO(s) to be mixed into the Casa wallet then click ‘Mix to’.
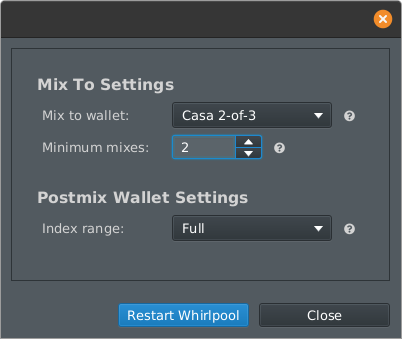
In the pop up window, select the imported Casa wallet from the Mix to drop down then select the minimum number of mixes required before the UTXOs are eligible to be sent to the Casa wallet, a higher number here will improve your privacy but means the move to Casa will take longer. Finally, leave the index range to Full and click Restart Whirlpool.
‘Mix to’ configuration
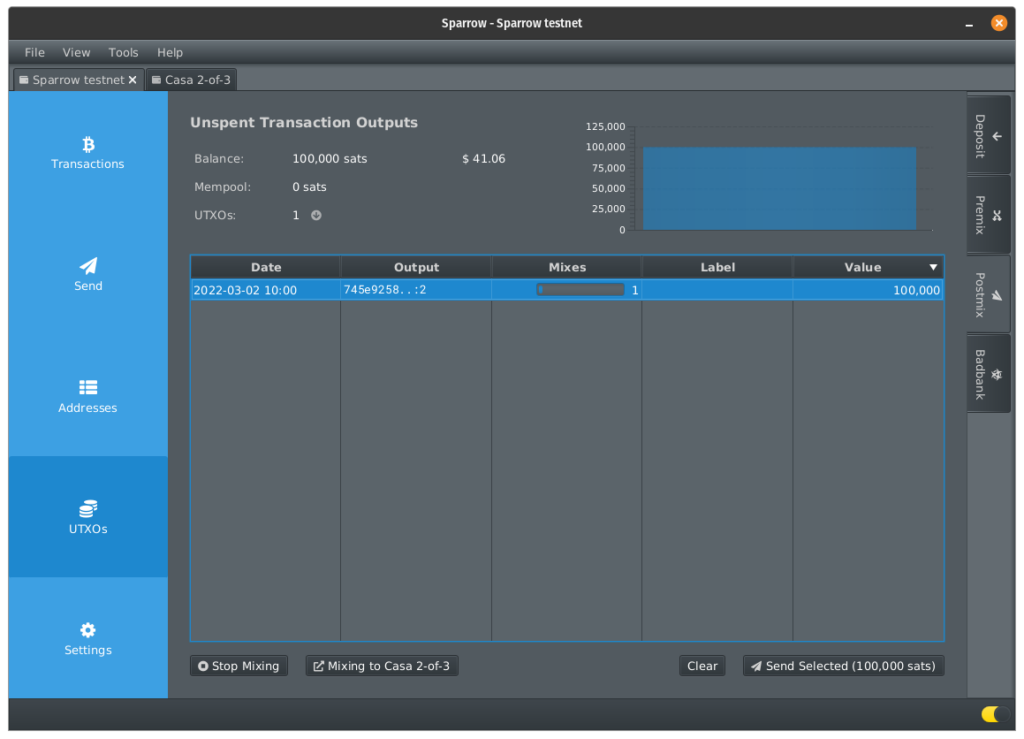
Now, when clicking on the UTXOs selected earlier, Sparrow will indicate at the bottom of the screen that they are ‘Mixing to Casa’. Again, all you need to do now is leave Sparrow running on your computer and it will take care of the rest for you.
‘Mix to’ started
After the defined amount of mixes have taken place, you’ll see incoming transactions of the pool amount landing in your Casa app (and the imported version on Sparrow). Each UTXO will be sent individually to your Casa wallet, and the more UTXOs set using ‘Mix To’, the longer the process will take to fully complete. Patience is key here and you can monitor everything from Sparrow.
It’s worth mentioning that whilst Whirlpool provides fantastic forward looking privacy for your mixed outputs, your wallet is still ultimately connected to Casa’s node, meaning that Casa will still know the UTXOs are yours.
the best of both worlds
By following the steps outlined in this guide, you really can have have it all! You get the awesome security and redundancy the Casa collaborative custody model offers, coupled with the fantastic forward looking privacy gained from using the Whirlpool coinjoin service within Sparrow. All of this, whilst also minimizing the trust placed in Casa by combining Passport with a Sparrow watch-only setup to validate everything the Casa app presents to you. Finally, in the highly unlikely situation that Casa were to disappear, you’re now also fully prepared to recover your Bitcoin too.
Stay tuned to our YouTube and BitcoinTV channels for an upcoming video tutorial on using Passport with Casa to secure your sats!